Our Bluebeam Tips and Blog Posts are Moving July 29, 2015
Posted by carolhagen in Bluebeam Revu, Construction Industry - Software.Tags: Bluebeam, Carol's COnstruction Technology Blog, Hagen Business Systems Inc, Moving
add a comment

“Flowers arranged to ALOHA, Hilo, Hawaii” by Father of JGKlein, used with permission – Father of JGKlein, used with permission. Licensed under Public Domain via Wikimedia Commons – https://commons.wikimedia.org/wiki/File:Flowers_arranged_to_ALOHA,_Hilo,_Hawaii.JPG#/media/File:Flowers_arranged_to_ALOHA,_Hilo,_Hawaii.JPG
It’s Goodbye and Hello… Yes, we’re saying goodbye to WordPress.com and starting July 30, 2015 all our blog posts will appear on a self hosted WordPress site inside our newly launched website at http://www.hagenbusiness.com/blog/ so you’ll need to adjust your favorites to the new address. Hope you’ll all browse our new website. Whether you need help finding a solution or want to learn more about what prducts we work with daily on our solutions pages we are commited to increasing the productivity of Architects, Engineers and the Construction industry. We’ll continue to post Bluebeam Tips, Tricks and Shortcuts on our LinkedIn page “Bluebeam Revu Tips” so no adjustments if that’s where you currently consume our content.
For all you Bluebeamers, we’ll be tweeting live from the Bluebeam Extreme Conference and are proud to be sponsors of the event as well. Whether you’re on Twitter or not, you can still see all the action July 29-31, 2015 using this link.
Oh, and if you’re thinking about Windows 10, be patient and wait! Bluebeam won’t officially be compatible until the Revu 2016 release.
Thank you all for being fans of my blog and we’ll catch you on the other side!
Carol Hagen
Pulling Data from a Scanned PDF into Excel July 1, 2015
Posted by carolhagen in Bluebeam Revu, Construction Industry - Software.Tags: Bluebeam Tips, convert table data to spreadsheet, Excel, Export Data, extract data from PDF
8 comments
When printed materials are distributed at your next seminar or meeting, or your find a magazine that contains a table that you find valuable, most people scan the document to PDF to save it for later. Sometimes you want this data entered into a database or added to spreadsheet. If you can get it to a spreadsheet you can usually import into a database but who wants to key in all that data? There’s a better way if you have Bluebeam Revu Extreme.
In today’s Bluebeam tip I’ll step you thru scanning a page from an Owner’s Manual and export the part numbers to Excel.
For those who do not want to watch a video, there are two basic steps:
1. Scanning the Document to PDF
File | Create and choose From Scanner or Camera then follow the prompts displayed to select your scanner or camera, page size and document attributes (Black & White, Grayscale, etc)

2. Export to an Excel Workbook
File | Export and choose Excel Workbook | Page Region and then draw a rectangle around the data, including the column headings. Bluebeam Extreme does the rest!

Here are a few other ideas of how you could use this:
Accounting: Import the expenses from a credit card statement so you can sort by expense type and subtotal in Excel.
Business Development: Grab the top business lists from local publications for leads and their phone numbers.
What other ideas will you come up with to export to Excel?
AEC Hackathon Recap (June 27-28, 2015) June 29, 2015
Posted by carolhagen in Construction Industry, Construction Industry - Software.Tags: AEC, AEChackathon, apps, construction, technology
add a comment
Update: (July 6, 2015) You can now watch the presentations on the AECHackathon YouTube Channel
Since most of my readers are not on Twitter, I’ve decided to share the tweets which are jam-packed with emerging technologies in the construction, architecture and engineering sector. I’ve cherry picked the cream of the crop to keep and put them in the order they occurred to make it easier for you to get a taste of what you missed at the AEC Hackathon and what the value of Twitter is (when you can’t be there in person). Enjoy!
These Tweets were ramping us up for the start:


Starting up, teams at work and when the next AEC Hackathon is taking place:

Presentations Begin:


And the Winners Are:


For active links to all these posts, go to live #AEChackathon feed, @AEChackathon Tweets, the AEC Hackathon YouTube Channel or their website
Now you might realize why Twitter is one of my favorite sources for learning and keeping abreast of emerging technologies. To read all my construction and tech tweets on Twitter please follow me or just tune in (no Twitter account necessary)
Bluebeam Revu Tips: Estimating Wall Area June 24, 2015
Posted by carolhagen in Bluebeam Revu, Construction Industry - Software, estimating.Tags: Bluebeam Revu Tips, estimating, Painting Contractor estimating software, Wall area Take-off, Wall contractor estimating software
add a comment
Painting and wall contractors find estimating take-offs easy when the wall area can be calculated quickly. Using a Perimeter measurement tool or an Area measurement tool , open the properties tab and enter the wall height into the Depth field to enable the measurement of the Wall Area column in the Markups list. You can of course create you own custom tools to expedite the process. I’d suggest if you are only interested in taking off wall area, make your own custom wall tools for your common wall heights (8, 10, 12 ft, etc) so you can reuse them and not have to enter the depth field each time.
This video shows a resilient flooring tool, an area measurement) that then has the depth entered. This method saves time in that you get multiple calculations in one measurement. I’d use this method if I were a general contractor or a wall and flooring contractor.
The feature for taking off wall area was introduced back in 2014 with the Bluebeam Revu 12 release. If you have an earlier version of Revu and would like to upgrade to the latest release, Click here and email me your contact info. I’ll help get you upgraded.
For more Bluebeam estimating tips you may want to read these previous posts:
Manual Counting Ends with Visual Search
Multiple Monitors for Estimating Take-off Productivity
Show all Measurements in an Estimating Take-off
Sending PDFs to EverNote, Box and DropBox June 15, 2015
Posted by carolhagen in Bluebeam Revu, Construction Industry - Software.Tags: Bluebeam Revu Tips, Extreme, script, Sending PDFs to Box, Sending PDFs to EverNote
1 comment so far
 Going mobile and paperless is part of the Bluebeam experience so how do you send your PDFs to mobile devices? You can use the email options of EverNote, DropBox and Box. So what makes this a Bluebeam Tip? I’ve created a script for each app (available in Bluebeam Revu Extreme only) and pinned it to my tool bar. It’s likely you are sharing these PDFs so you can use hyperlinked documents on all your mobile devices. Obviously Bluebeam has an iPad app but nothing on Android or on the iPhone for that matter. First, let’s look at the details of how to send PDF’s directly to your favorite mobile file storage app. Then I’ll show you how to make a script and pin it to the tool bar of your choice. Obviously, you’ll want to clear this with your IT department as company policy may limit where documents can reside.
How to Send via email to EverNote
You can obtain your EverNote email address from your account information then control where the note is stored by specifying it in the email subject line. If you need help finding your email to EverNote address you can get complete instructions from in their knowledge base. The syntax for emailing to EverNote using the Email Subject is: [Title of note] ![optional date for Reminder] @[notebook] #[tag] If you have a few projects going, you’re probably have separate notebooks for each project. Then use the tag as the type of document: RFIs, Submittals, Photos, Specifications, Revisions, Sets, etc. what’s really cool about EverNote is it’s auto-filing feature for email. Auto-filing will look for similar notes inside your account and apply the same notebook and tags.
How to Send via email to Box
In Box you have to enable a folder to allow uploads via email. You do this by navigating to the folder you want,  then click on the More dropdown, then go to Folder Properties > Email Options. Each folder gets its
 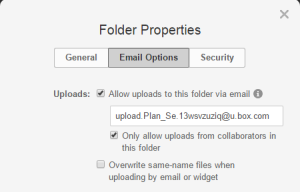 own email address. Box also isn’t storing the email but just the file attachments. In this case you may want to create scripts for each project and/or project sub folder for those RFIs. Sets, etc. You can set notifications (to the folder owner only) if you have a project administrator that will file the documents to the proper sub folder and you want to send multiple documents (RFIs, Specs and images) all in one email. Copy the email address assigned to your folder and use it in your script.
How to Send via email to DropBox
DropBox doesn’t have a native send attachments via emails yet, but there is a 3rd party solution called Send To DropBox that is trying to fill the gap. All attachments will reside in one folder with Send To DropBox and currently you cannot share the attachments folder with anyone else. I expect that with DropBox’s acquisition of MailBox they’ll eventually offer a way to email to a project specific folder. You can get around this if you instead use the If This Then That App (IFTTT) and grab this recipe. The recipe lets you specify the folder you want the attachments to go to in Dropbox.
What is a Script?
Scripts provide one button access to numerous functions that are performed in sequence. It’s kind of like a macro in Excel as it can save you many keystrokes. It looks a bit like programming but easier. If you need help drop me an email or ask your techie guy or gal. As an example, Bluebeam provides a “Flatten and Email” Script with Revu Extreme since you’ll often you want to share hyperlinked PDFs like plan sets with others. It can also be used for numerous other functions like adding headers and footers, stamps, reduce the file size, rotate pages and more. If you count the number of times you do these repetitive functions each week, you’ll likely be asking why you only have Revu Standard or Revu CAD. To learn more about what Bluebeam Extreme can do for your company sign up for our free “Making the Case for Revu Extreme” Webinar June 17 at 11:30 am Pacific (You can request the webinar recording if you’ve missed it, by clicking Here.)
Creating Your Script
I’ve created one for each app and placed it in my custom Tool Bar “Send To Mobile” but I’ll just step you through one. You’ll find Script under the Document tab in Bluebeam Revu Extreme. Start by Clicking the Script Icon and then click Add to get to the Script Editor. First you’ll name your Script. I’ll name mine “Flatten and Send to Box”.
 Next, you can choose an icon from the list or import one. You could grab the Box logo off the web, or a photo of your project if using a “Box” specific email address. My sample shows the logo. Then in the Actually script I start with the Flatten command. Since I’m choosing to upload plans, I want all my markups flattened so I don’t need to specify any additional settings for the flatten function, Just put an open and closed parenthesis after the command. The second process I want to run is email and it is here that I add my folder specific email. I have limited who is allowed to upload to this folder to collaborators only and my Upload Plans Folder is a subfolder of my Sample Project Folder.
The script for Evernote is similar, except you’ll use your EverNote email address and likely add in the title, specify the project notebook and tag it using the subject line. As an example for updating specifications to EverNote, the email subject would be “Revised Specs as of 6/15/15 @Project 100 #Specs”.
 For DropBox, if you are using Send to DropBox, all email attachments are dropped into one file folder so you better have good filenames for your attachments.
Add the script to your toolbar
On the Document Tab, click on the down arrow next to the Script icon. With your mouse, hover over the name of the script you want to add to a toolbar and click on the yellow Pin to the right of the script name. This displays all your toolbars. You can add your script to an existing toolbar or select New Toolbar from the bottom of the list and give your custom toolbar a name.
If you’re thinking I need help in making scripts, custom profiles, etc, just Email Me Your Contact Info.
How to Find Your Center with Bluebeam Revu June 11, 2015
Posted by carolhagen in Bluebeam Revu, Construction Industry - Software.Tags: Bluebeam Revu Tips, Bluebeam Shortcuts, Center, construction, Find the Center
1 comment so far

Finding your center isn’t about Yoga. Whether you want to hang a chandelier or start laying carpet tiles you’ll want to start in the middle of the room. If you start with a square or rectangular room, you could find the center by placing two Diameter measurements and rotate one 90 degrees to see where the diameters cross. This method won’t work though if you have a an arch on one side of the area, like in this hotel foyer (above).
 In this case the ideal tool to use is either the Rectangular Sketch Tool or the Area Measurement Tool and in the properties deselect Show Caption and Check the Centroid. The centroid is the geometric center so the shape of the space will impact your results.
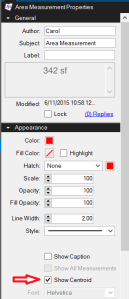
The Centroid function is also available in the Volume measurement tool and numerous sketch tools including the ellipse, polygon, and polyline. Note that Sketch Tools are only available in Revu 2015 and are found under the Markups Tab. If you don’t have Revu 2015 (look under Help | About to find what version you have), give me a call and I’ll help you get upgraded.
For those readers who have Bluebeam Revu Standard or CAD editions and are interested in what the benefits are of having Extreme we’re hosting a free Webinar “Making the Case for Revu Extreme” on July 17, 2015 at 11:30am pacific time. Click here to learn more about this webinar and to RSVP. We hope to see you there.
Bluebeam Tip: Estimating and Layers May 18, 2015
Posted by carolhagen in Bluebeam Revu, Construction Industry - Software, estimating.Tags: Bluebeam Revu Tips, construction, estimating, Layers, Take-off
2 comments

How many times during your estimating take-off do you right click and add an item to a layer? You use layers to place like items together (all the electrical, all the the flooring or all the insulation, etc.), so you can toggle these layers on and off, to isolate trades and to keep your take-off ordered and uncluttered. When using one drawing to take-off many trades, layers helps but adding an item to a layer each time you take-off an item in Revu is time-consuming. There’s a quicker way.
 Estimating professionals take-off like items together. By chunking your work you are naturally more efficient as your mind works best when focused. Once you take off all the plumbing (or electrical fixtures, etc) there’s a quick way to add all of them to a layer using the flatten tool. Just check the box next to Assign Layer then type in the Layer name (overwrite the default ‘Markups” in the text box). As you add Layers, a drop down choice will show you your previously entered layer names. Remember to keep the unflatten option checked so you can add any missed items and to then create or export your report summary to .CSV format (Excel) later. If you haven’t used the layers function you’ll want to turn the Layers Tab on in your left panel using the Tab Access (It’s an upside down orange triangle on the command bar). Then check/uncheck any layers you want to display/hide.
You could alternatively use CTRL-A in the Worklist then Right Click and Create a New Layer, but this doesn’t get all your markups out of the way in the Worklist for the next set of related take-off items like the Flatten Tool does. What else do you use Flatten for? The flatten function in Bluebeam Revu is important to use so you don’t accidentally move markups that should remain in place and it makes the markups printable. It’s also important when you email PDFs to others (who may not have Bluebeam yet) so that hyperlinks work in those other PDF programs.
For more tips on Estimating with Bluebeam, these topics may be of interest to you:
Multiple Monitors for Estimating Take-off Productivity
Bluebeam Tips: Construction Safety Hazards using Pictograms April 22, 2015
Posted by carolhagen in Bluebeam Revu, Construction Industry - Software, Safety.Tags: Bluebeam Tips, construction, OSHA Hazard Pictograms, safety, Safety design layout
1 comment so far

How’s this for trench safety? (Photo by Ernest Brooks, Trenches of the 11th Cheshire Regiment at Ovillers-la-Boisselle, on the Somme, July 1916.)
OSHA’s new Hazard Communication Standard goes into effect June 1, 2015 and will require pictograms on labels as a safety measure. These new labels are there to alerts us to the specific types of chemicals hazards. They serve as a reminder to warn us of danger and to take special care. These visual cues should heighten our awareness so why not place them on your plans to remind employees as they enter work areas what is present? Use Bluebeam to help you with safety talks, acting as a visual aid.
Why visuals are so important to safety

Trench Safety and Job Site Hazards (photo by Sherry Eklund of Desert View Aerial Photography http://www.dvaerialphoto.com)
It only takes us 150 milliseconds for a symbol to be processed and 100 milliseconds to attach a meaning to it. Every safety meeting should incorporate visuals, not just speaking or text. They are also easier to recall. That’s why pictograms are on the labels of hazardous material and having your team review the locations of these materials can be life saving. These pictograms may be incorporated onto the site planning for stationary hazards, or preexisting conditions. It’s great for remediation or environmental cleanup projects and will help your employees return home safe and sound. Adding visual symbols on HAZOPs, P and IDs and construction safety studies are also a good idea. Besides placing signs or symbols, shading work zones with open trenches, equipment traffic flow or crane boom reach, possible falling objects, etc is beneficial too. How bout scaffolding locations on the jobsite and lift placement. The list goes on.
 You can find OSHA’s pictograms in vector quality (.EPS format) on the Department of Labor website (https://www.osha.gov/dsg/hazcom/pictograms). Add these tools to a new safety tool set in your custom “Safety Profile” and you’re ready to go. If you aren’t familiar with how to create custom profiles, custom tool sets or custom tools you may want to review these previous posts (below) or request our OSHA Hazard Pictograms tool set in our Safety Profile for Revu (for free): Email Me Your Contact Info.
Hagen Business Systems Inc can create custom profiles, tool sets and tools for your teams. To request these services, send an email with your business contact information to Email Me Your Contact Info.
Bluebeam Tip: Adding a Responsibility Column with a Choice to your Worklist March 26, 2015
Posted by carolhagen in Bluebeam Revu, Construction Industry - Software.Tags: Bluebeam, Bluebeam Revu Tips, custom columns
5 comments
The Punch and Back Check, Design and Constructability Reviews and Estimating Take-off are all top construction workflow that Bluebeam Revu improves for the general contractor and specialty trade alike. Realizing that once you create your own punch symbols (or import those that Bluebeam has available on their website), you”ll want to assign who is responsible for each punch item. The worklist’s Responsibility column in Revu 2015 is set as a text column. This leaves the column blank and you must fill in each item manually. If you’d rather a dropdown list to choose from it just takes a few minutes to create.
How to add a Responsibility column with a Choice to your Markup Work list:
You must have a PDF document open to proceed. Choose which profile you want to add the custom Responsibility column to or
1. In the worklist, click on the gear next to Columns to Manage Columns.
2. Choose the Custom tab and select Add if the Responsibility column isn’t already there..
Enter “Responsibility” as the Name and pick “Choice” from the dropdown (otherwise choose “Modify” and change the Responsibility Column’s Type to “Choice”).

3. In the Item field, enter the name of who will be responsible. This typically is either a person’s name or a company name.
4. In the Subject field, enter the subject for the item. This links to the Subject property of a markup, allowing for selective filtering of the list based on the markup.

Note 1: The Subject of the Markup must match the Item’s Subject exactly for it to appear as a selection in the markup’s Responsibility dropdown choices (i.e. it is case sensitive). If you do not include a Subject for an Item, it will be available to use on all markups regardless of the subject.
Note 2: If you want to also have the option to enter a name not listed in the dropdown choices, click on Format while in the Add Column or Modify Column dialogue box and check the box for “Allow Custom Text”.
Note 3: Many Bluebeamers have custom profiles for each project as the Responsibility list may be job specific. A responsibility column is also handy for Design and Constructability Reviews.
Note 4: If you want certain custom columns, custom tool sets and toolbars available in Studio Sessions, they are stored in the document (or **Saved in a Profile). Make your changes to your worklist columns, etc with the document opened that you plan to upload to Studio. Save the document after you have made your customizations, then upload it to Studio.
Note 5: If you have 10+ Subjects or Responsibility Items (names) to add, it may be quicker to create a file and use the Import Option in the Modify Columns dialogue box.
Creating a Responsibility List to Import
This begins with a CSV file. You can create a CSV file even without Excel by just using NotePad using these steps:
1. Access Notepad click on Start | All Programs | Accessories | NotePad or if using Windows 8+ use the Charms feature and search for “NotePad”
2. Using the format “Item”,”Subject” type in one choice per line with each component in “quotes” and separated by a comma as shown here:

3. Once you’ve added all your entries, Click File | Save as and name it ResponsibilityList.TXT (save it as a .TXT file on your desktop).
4. Use Steps 1 and 2 from the “How to add a Responsibility code to your Markups List” above and select Import.
Note: The Import option will replace an already existing list of Items in your custom column for the document you have open.
If you **save it to a profile it is changing the list for all documents using this profile moving forward.
**Check with your network administrator before saving to a profile as your company’s profiles may be on a shared drive and impact all other Bluebeam Revu users.
If you’d like to hire me to create Custom Profiles, Toolbars and Tool Sets for your firm, please Email Me Your Contact Info.
Bluebeam Tips: Notes with Icons March 10, 2015
Posted by carolhagen in Bluebeam Revu, Construction Industry - Software.Tags: Bluebeam Revu Tips, Bluebeam Tips, Construction Plans, Notes, PDF Markups
2 comments
![]()
If you use the Notes Markup tool to minimize the clutter on your documents, you’ve likely noticed the small icon that appears as a small piece of paper with lines on it. It’s great when there are many markups in a small area on the document. What most of you haven’t noticed is the properties options in this tool.
Changing icons can provide a mini legend for types of notes. Take the time to create your own tool set or color code them for document reviews and you have another power tool in your tool chest. Stars, keys, triangles, circles, checkmarks, right arrow, up-left arrow and my favorite, the Cross (cause X marks the spot). You’ll have so much fun you might want to make a treasure map! Too bad there aren’t clovers since St Patty’s day is just around the corner.
Let’s see what readers have mastered Bluebeam Markups. What other Markup tool has an option to change the icon displayed? (post your answer in the comments)
You might also like to read:
Bluebeam 2015 Tip: How to Add Cloud+ to Profiles, Tool Chest and Tool Bars February 25, 2015
Posted by carolhagen in Bluebeam Revu, Construction Industry - Software.Tags: Bluebeam Revu Tips, Cloud, Cloud Plus, Tool Chest, Toolbar
1 comment so far
With the Revu 2015 Bluebeam’s Cloud+ will save you many clicks in your PDF markups work, and while it is present in the Markup | Shapes it is not automatically added to your tool bars, tool chest, tool sets and profiles. If your firm has many licenses of Revu (Standard, CAD or Extreme), and your save your profiles in a network drive, check with your systems administrator before proceeding. Only one person needs to perform all these steps, as you can import or export the profiles to email them to other Revu users in or outside your firm.
The first place you’ll want to add Cloud+ is to your Construction Profile’s toolbar on the right panel. Make sure you’re in the Construction Profile, then:
1. Navigate to View | Toolbars | Customize.
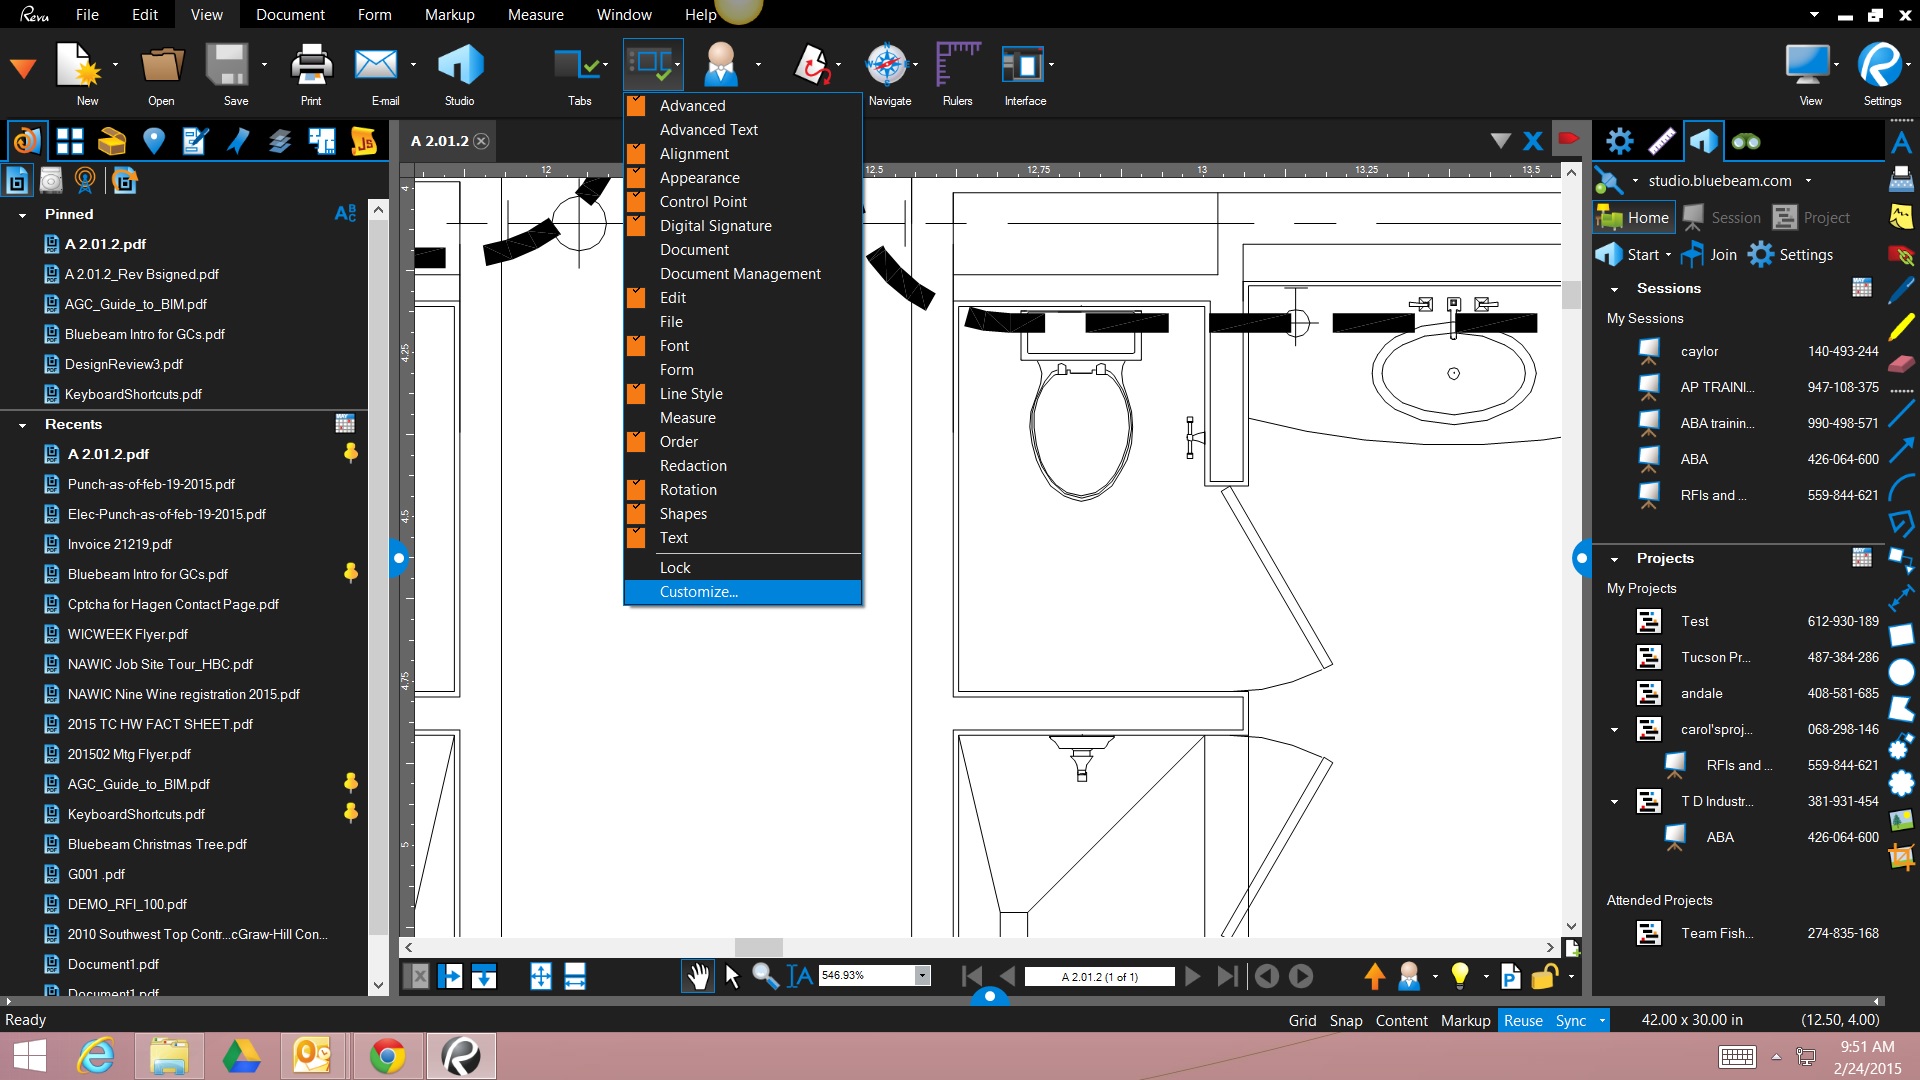
2. Change the Toolbar categories to either Markup or All.
3. Scroll down the Commands and click on Cloud+. 
4. In the Toolbar section select Shapes so the shapes appear in Items section.
5. Click the right arrow symbol (add command) so that the Cloud+ tool appears in the Item section.
6. Use the Up/Down arrows to position the Cloud+ just above or below the Cloud tool.
7. Click OK to Save it.
Repeat this process in any profile and on any toolbar you want Cloud+ added.
The second place to add Cloud+ is in the Design Review Profile so that the Architect’s, Engineer’s and Contractor’s Review Tool Sets had the Cloud+ in their appropriate color scheme. Make sure you are in the Design Review Profile with any PDF document opened.
1. Place a Cloud+ markup on the document (if you haven’t added it yet to this profile, you’ll find it in Markup | Shapes or use the shortcut “K”.
2. With your Tool Chest in the left panel, right click on the cloud tool in the Architect’s Review Tool Set, and select the Paint Format and click on the cloud portion of the Cloud+ markup you already have placed. This paint the cloud portion of the Cloud+ with the Architect’s color palette. 
3. Click ESC to exit Paint Format.
4. Drag and drop the Cloud+ (now with the Architect’s color palette) from the Recent Tools to the Architect Review Tool Set
5. Right click on the Callout tool in the Architect’s Review Tool Set, and select the Paint Format and click on the callout portion of the Cloud+ markup you already have placed. This paint the callout portion of the Cloud+ with the Architect’s color palette.
6. Repeat steps 2 ,3 and 4 for the remaining Engineer’s and Contractor’s Review Tool Sets. And any other custom tool Sets you may have created for other collaborators.
7. View | Profiles (the arrow next to profiles) and click Save Profile
To Import or Export Profiles so you can share these changes with others, search for Importing and Exporting Profiles in the Help menu (F1).
Bluebeam Revu: Site Planning 101 February 5, 2015
Posted by carolhagen in Bluebeam Revu, Construction Industry - Software.Tags: Blubeeam Revu, Bluebeam Revu Tips, scalable tools, site planning, Sketch tools
add a comment
Site Planning just became easier with the Blubeeam Revu 2015 release thanks to the new Sketch Tools. Whether you want to place a crane, trailer or define a temporary parking lot you can now define dimensions and also create scalable tools to reuse with your common site plan items. Creating markups to scale are useful on shop drawings, floor plans, installation detail as well.
Sketch Tools:
The new markup sketch tools include a polygon, ellipse, polyline or rectangle. You can use the drag out for a rectangle and it will pop-up the dimensions as you drag, or enter individual dimensions. Let’s see it in action
Dynamic Tool Set Scaler:
To create dynamic scalable tools you’ll need to define the baseline scale of your tool set. This also works with grouped shapes. I’d also recommend it for landscaping elements, fixtures, furnishings, and your RFI and submittal place holders (those markups that hyperlink to the actual forms) for a consistent look to your owner’s as-builts.
Bluebeam continues to deliver on their promises with architecture, engineering and construction tools to make the project team more productive. With the site planning and design capabilities in the new sketch tools and dynamic tool set scaler you’ll want to revisit your tool sets and custom profiles so your team can be more productive.
If you haven’t installed Revu 2015 yet, what are you waiting for?
Making Interactive Plan Sets (Auto Mark and Batch Link) February 2, 2015
Posted by carolhagen in Bluebeam Revu, Construction Industry - Software.Tags: Bluebeam Revu Tips, construction, Hyperlinked Plans, Interactive Plan Sets
1 comment so far
Today’s Tip will help everyone working on the project by making Interactive (Navigable) Plan Sets . Using vector based plans is key to making interactive plan sets so the sheet index is hyperlinked to each page. With Bluebeam’s Automark and Batch Link the time to get this done is just a minute or two away.
We covered AutoMark previously, and though it would help to see the progression to Batch Link (a Revu Extreme 12+ only feature) streamlines the hyperlink process.
We’ll cover adding hyperlinks to plan details, creating Sets and batch slip sheeting (Revu 2015 Extreme Only-Release Date Feb 3, 2015) in future posts.
If you don’t already have the Extreme version of Bluebeam, contact your IT administrator or Email Me Your Contact Info and we’ll get your upgrade processed today!
If you haven’t tried Bluebeam Revu, download a 30 day free trial of Extreme here.
Bluebeam Shortcut: Snap, Sync, and Reuse with the Construction Profile January 29, 2015
Posted by carolhagen in Bluebeam Revu, Construction Industry - Software.Tags: Bluebeam Revu, Bluebeam Shortcuts, Bluebeam Tips, Snap, Status Bar
1 comment so far
 The popularity of the Construction Profile in Bluebeam Revu often leads to a bit of confusion for newer Bluebeamers. The Status Bar is hidden by default in the profile and so I frequently see people changing the profile they’re using to Takeoff or Advanced so they have the options to Snap to Content, Snap to Markup, Sync side-by-side views or Reuse markups.
Let’s save you some time and instead share the shortcut, F8. This will toggle the Status Bar Off/On in all Revu profiles. Of course if you want to, you could modify the profile so it’s always there too!
For more ways to access the Grid, Sync, Snap options, read “Making Markups a Snap in Bluebeam Revu”
With Bluebeam Revu 2015 arriving on February 3rd, 2015 I encourage you to contact me via email or call me 602-570-7289 today if you do not already own a Bluebeam Revu Extreme license. You’ll wish you did if you deal with larger plan sets with 100+ pages. To check whether you have Standard, CAD or Extreme in Revu, click on Help | About
Bluebeam Studio: The Most Powerful, Overlooked Feature in Revu January 16, 2015
Posted by carolhagen in Bluebeam Revu, Construction Industry - Software.Tags: Bluebeam Revu Tips, Bluebeam Studio, construction team collaboration, construction team meetings
3 comments
While Bluebeam has 650,000+ users worldwide (as of August 2014) and growing, less than 10% of the customers use the free collaboration tool inside, Bluebeam Studio. Once you realize what it can do, you’ll be asking yourself, “Where have you been all my life?”, all over again. Use Studio to save time and improve productivity. Architects, Engineers, Specialty contractors, Material Suppliers and Owners love it.
Studio comes with every license of Revu (even the iPad Revu app) and is similar to GoToMeeting or Webex without audio controls, yet doesn’t require everyone you invite to attend simultaneously. Rarely are all construction teams available at the same time, especially when you need to meet with many people. Bluebeam understands that and has made an open ended cloud based collaboration site, with all the markup tools of Revu that the AEC Industry loves and the ability to have up to 500 people attend a Bluebeam Session. Come and go as you please and work online or offline. It will sync up automatically when you have connectivity.
Studio Sessions take care of collaboration. Studio Projects lets you share project files and folders including Word documents, Excel Spreadsheets, images, PDFs, DWGs, etc. You can check out documents from Studio Project, make revisions and check them back in or in the case of PDFs, collaborate on these documents in a Studio Session. With Revu you can convert many documents to PDF with the “Save As” option.
Common uses for Bluebeam Studio:
Design and Constructability Reviews (Studio Sessions)
Real-time Punch and Back Check (Studio Sessions)
Current Plan Sets – A Single Source of Truth (Studio Projects) including hyperlinked RFIs, Submittals, Images, Specifications, etc
Impromptu Problem Solving in the field with access from your iPad to photos captured of current conditions and access to sketch and markup with engineers, designers, etc
Check current project documentation and plans from anywhere.
Work completion updates including material staged (see “Visualizing Project Percent Complete with Your Owner” on how to do this).
Have a Markup you want to keep an eye on? Markup Alerts was added in Revu 12.5 to Notify Session attendees of markups in need of their attention, or in Studio Projects send them the Revision Alerts. Markp Alerts are sent as an email containing a snapshot view of the selected markup and the available associated metadata. The snapshot is also a link into the Session and clicking it will not only take the recipient directly into the Session, but straight to the markup as well. Users can send markup alerts for any markup, not just the ones they’ve created.
To create a markup alert, just right click on the markup in the Markups List while in a Studio Session:

Note that you can also see all the Pending items in the lower right panel of a Studio Session.
Don’t want volumes of email? Bluebeam thought of that too, with a daily digest option in the Studio preferences. You can see who’s been working and how much they’ve done. Stop emailing all your markups to the team and then having to combine all those separate PDFs with their replies and answers

Each markup placed on the PDF is tracked in the Record which links back to the PDF file, including its view at the time the markup was created. This is a great way to review the events of a collaboration Session once the Session is complete. Attendees can filter the information that is displayed in the Record by clicking Filter. The Record can also be turned into a Report.
Bluebeam Studio Best Practices:
Upload Project Folders including Images, RFIs, Submittals, Plan Sets, and Specifications Subfolders so that your relative paths remain consistent and your hyperlinks continue to work.
Plan Sets are best put into drawing subfolders for each discipline: 1-General, 2-Civil, 3-Architectural, 4-Structural, 5-Mechanical, 6-Electrical, and 7-Plumbing
If you want the drawings to appear in the industry plan set order, you should number your disciplines since folder structures default to alpha numeric order. (this numbering will be unncessary in Revu 2015 with enhancements to Sets 3.0 on February 3, 2015).
Create custom Profiles and Statuses (for your markups) to address the specific needs of your project. Larger projects may have more than one architectural firm, or have a complex multi-layered approval and reviewer requirement.
Benefits of Bluebeam Studio:
No Need to email back an forth, then combine PDFs to overlay and see who said what when collaborating with multiple parties.
No time zone issues when working with team members across the country or around the world.
Notify trades of revisions from a Studio Project
No need to have someone take meeting minutes! A perfect audit trail.
Ability to create and distribute daily/weekly records or a full report recap.
Here’s the Studio Stats of Sessions vs. Projects Recap:

If you own Revu Standard, CAD, Extreme, or Revu iPad, Here’s how to get started with Studio:
Don’t have Bluebeam Revu yet? Grab yourself a 30 day free trial here.
Bluebeam Tip: Email Templates January 2, 2015
Posted by carolhagen in Bluebeam Revu, Construction Industry - Software, email.Tags: Bluebeam Revu Tips, construction, email, Templates
3 comments
For those of you still not using a Construction project management solution or Bluebeam Studio and the notifications feature, you are likely sending many emails for RFIs, Submittals, etc. to the architect, general contractor, specialty trade or engineer. Bluebeam has PDF document templates for RFIs as a PDF document and as fillable form. If you correspond frequently with the same few people on a project, why not make email templates to expedite the process?
 Email templates can be prefilled with To, CC, BCC, Subject, and Message so you can create a template for a specific Architect when sending an RFI, like this that reduces keystrokes for your project manager:
To create an email template in Bluebeam, click File
and hover over the down arrow next to Email, then select Manage E-mail Templates 
If you have a large project with over 100 RFIs expected, you may want to put the Project Name in the Subject line and save the template as RFI to specific Architect for Project XYZ. Obviously you can do the same thing for submittals and to other recipients you frequently email.
 What you end up with is a dropdown to select from like this (right). Email templates are especially handy for project managers assigned to one project for an extended timeframe.
Note that the dropdown list appears in alphabetical order. Be careful to create a good naming convention either by type of correspondence (RFI, Submittal, etc), by project name, or by recipient for consistency and ease of use.
Question for my readers:
What Document templates have you created beyond the Fax, Field Report, Invoice, Memorandum, Punch, RFI and submittal choices delivered with Bluebeam Revu? Please share your list of templates and forms in the comments.
New to this blog? Please either follow me on Twitter, connect with me on LinkedIn or subscribe in a reader to learn new tips every week.
Next week I’ll cover notifications inside Bluebeam Studio.
Bluebeam Revu Quick Tip: Spaces Snapshots November 19, 2014
Posted by carolhagen in Bluebeam Revu, Construction Industry - Software.Tags: Bluebeam, Bluebeam Revu Tips, Construction Plans, snapshot tool, Spaces
add a comment
Before marking up your plans, particularly for the punch process many clients use the Spaces Tool to designate areas. Today’s tip is a bonus of taking the time to create spaces. You can grab a snapshot of a space quickly. Just open the spaces tab and right click!

There are a few Settings | Preferences (CTL+K) for the Snapshot Tool that you can tweak including the resolution, whether you want vector graphics when pasting to another program and including markups in your snapshots. Obviously for the punch process you’d want to include the markups but there are applications for not including the markups as well.
If you have questions you need answered about Bluebeam, reach out to me on LinkedIn, email me or add your question in the comments. Perhaps your question will appear in a future Bluebeam Revu Tip on this blog.
Bluebeam Tip: Construction Coordination Overlays October 7, 2014
Posted by carolhagen in Bluebeam Revu, Construction Industry - Software.Tags: Bluebeam Revu, Bluebeam Revu Tips, construction, coordination
add a comment
The Document Comparison features in Bluebeam Revu are great for spotting differences between revisions but did you realize you can also use the Overlay Pages option for your construction coordination?
Simply select the construction disciplines you want to coordinate and assign each an appropriate color in the overlay pages dialogue box. The great part about using the overlay pages function is that each discipline (file name) will automatically come across as a layer so you can toggle each discipline off/on as you work on the coordination. In the sample below we used overlay pages with three documents: S1.2, A401 and E201 being the structural framing plan, architectural rcp and electrical wiring diagram respectively. To view your layers, use the shortcut ALT + Y or select layers from the Tab Access Menu.

Bluebeam Revu is versatile and often one function serves multiple purposes. Once you overlay your coordination, you may want to assign work areas using Spaces and create a schedule for your specialty contractors, part of workface planning and the Fiatech Advanced Work Packaging (AWP) project.
Want to learn more about Bluebeam or need one on one web training for your construction team or office staff? We offer customized training for your Project Managers, Estimators and supporting office staff. To arrange for web-based Bluebeam Training using GoToMeeting, Email Me Your Contact Info.
Bluebeam Tips: Plan Set Page Numbers from Title Block Sheet Names September 25, 2014
Posted by carolhagen in Bluebeam Revu, Construction Industry - Software.Tags: AutoMark, Bluebeam Revu Tips, Construction Plans, Page Numbering, Sheet Index, Title Block
add a comment
Construction plan sets can be hundreds of pages long and often are delivered to contractors as one PDF with 100+ pages, with the page numbers labeled from 1… 100+. As contractors and engineers you want to work efficiently and Bluebeam has a way to quickly rename these pages with the title block sheet number. Prior to Bluebeam Revu release 11 you had to manually change the page numbers and it could only pull from one page region of a plan set. With Revu 12, you can pull from multiple regions to obtain a sheet number and name.
Revu calls this Automark and it let’s you pull alpha numeric information from anywhere on a page and set that data as either the page label or bookmark. As a bonus, Revu version 12 can obtain the numbering from multiple regions so you can pull both the page number and the title block page description. Here’s the Automark 2.0 video to show you how it works:
Automark is often the first step in creating a hyperlinked plan set, so you can navigate efficiently between pages and back to your sheet index.
Notes: If you are working with plan sets that are scanned images and are using Revu 11, Bluebeam could not identify the sheet page numbers as alpha numeric. To address this you could either use the OCR capabilities (requires Revu Extreme version) or upgrade to Revu 12 that enhanced the Automark function (called Automark 2.0) for this purpose.
To determine if you are working with scanned plans, you may want to review my prior blog post on searchable text.
If you need to upgrade Bluebeam Revu from a prior release or want to know the advantage of Bluebeam Extreme over Revu Standard, check to see if you have an annual maintenance subscription or Email Me Your Contact Info and I’ll help you get upgraded to the latest release (12.5 as of today 9/25/14).
Bluebeam Tips: Presentations without Powerpoint September 18, 2014
Posted by carolhagen in Bluebeam Revu, Construction Industry - Software.Tags: Bluebeam Revu Tips, Powerpoint, presentations
2 comments
Bluebeam Revu is great in making PDFs of all sizes including pages that are perfect for slide presentations. Revu can also be used for creating slides and has it’s own presentation mode. You can also use the Presentation mode to view Full Screen and loop the slidedeck too.
 To get started, create a new document and chose the custom Slides template (10 x 7.5 in portrait mode). Then copy, paste, use markups and the snapshot tool to create your slides. With the ability to place images, and use layers like we shared in our earlier blog post architectural illustration to toggle different element on or off. you can make almost anything. If you need to pull images from the web or other non-PDF sources, you may want to get Jing from TechSmith. Jing is a free download that I recommend when you don’t have spare change for Snag-IT.
Once you have your slide content complete, Presentation Mode is just a CTL + Enter away! That’s the shortcut to enter presentation mode. To exit presentation mode press ESC. You can also get to Presentation Mode from the View Menu in the upper right next to Settings. The view menu looks like this

Presentation Mode settings have options for Auto advance, loop after last page, background color choices and even offers page transitions (dissolve, zoom, split, fade,, etc). You can select your preferences from Settings | Preferences or just use the shortcut CTL + K and select Presentation.
Alternatively, if you have a Powerpoint slide deck you can use Bluebeam to convert it to a PDF. This is especially useful when sharing with someone that does not have the Microsoft Powerpoint application. If you don’t see the Bluebeam Office Add In (See right) when in Powerpoint, use the Bluebeam Administrator application to activate the Microsoft Office Plug-In or contact your systems administrator.
Want to learn more about Bluebeam or need on-site training for your construction team and office staff? I am available and travel the United States providing in-house customized training for your Project Managers, Estimators and supporting office staff. To arrange for Bluebeam Training in your offices or on-line, Email Me Your Contact Info.


