Our Bluebeam Tips and Blog Posts are Moving July 29, 2015
Posted by carolhagen in Bluebeam Revu, Construction Industry - Software.Tags: Bluebeam, Carol's COnstruction Technology Blog, Hagen Business Systems Inc, Moving
add a comment

“Flowers arranged to ALOHA, Hilo, Hawaii” by Father of JGKlein, used with permission – Father of JGKlein, used with permission. Licensed under Public Domain via Wikimedia Commons – https://commons.wikimedia.org/wiki/File:Flowers_arranged_to_ALOHA,_Hilo,_Hawaii.JPG#/media/File:Flowers_arranged_to_ALOHA,_Hilo,_Hawaii.JPG
It’s Goodbye and Hello… Yes, we’re saying goodbye to WordPress.com and starting July 30, 2015 all our blog posts will appear on a self hosted WordPress site inside our newly launched website at http://www.hagenbusiness.com/blog/ so you’ll need to adjust your favorites to the new address. Hope you’ll all browse our new website. Whether you need help finding a solution or want to learn more about what prducts we work with daily on our solutions pages we are commited to increasing the productivity of Architects, Engineers and the Construction industry. We’ll continue to post Bluebeam Tips, Tricks and Shortcuts on our LinkedIn page “Bluebeam Revu Tips” so no adjustments if that’s where you currently consume our content.
For all you Bluebeamers, we’ll be tweeting live from the Bluebeam Extreme Conference and are proud to be sponsors of the event as well. Whether you’re on Twitter or not, you can still see all the action July 29-31, 2015 using this link.
Oh, and if you’re thinking about Windows 10, be patient and wait! Bluebeam won’t officially be compatible until the Revu 2016 release.
Thank you all for being fans of my blog and we’ll catch you on the other side!
Carol Hagen
Bluebeam Tip: Adding a Responsibility Column with a Choice to your Worklist March 26, 2015
Posted by carolhagen in Bluebeam Revu, Construction Industry - Software.Tags: Bluebeam, Bluebeam Revu Tips, custom columns
5 comments
The Punch and Back Check, Design and Constructability Reviews and Estimating Take-off are all top construction workflow that Bluebeam Revu improves for the general contractor and specialty trade alike. Realizing that once you create your own punch symbols (or import those that Bluebeam has available on their website), you”ll want to assign who is responsible for each punch item. The worklist’s Responsibility column in Revu 2015 is set as a text column. This leaves the column blank and you must fill in each item manually. If you’d rather a dropdown list to choose from it just takes a few minutes to create.
How to add a Responsibility column with a Choice to your Markup Work list:
You must have a PDF document open to proceed. Choose which profile you want to add the custom Responsibility column to or
1. In the worklist, click on the gear next to Columns to Manage Columns.
2. Choose the Custom tab and select Add if the Responsibility column isn’t already there..
Enter “Responsibility” as the Name and pick “Choice” from the dropdown (otherwise choose “Modify” and change the Responsibility Column’s Type to “Choice”).

3. In the Item field, enter the name of who will be responsible. This typically is either a person’s name or a company name.
4. In the Subject field, enter the subject for the item. This links to the Subject property of a markup, allowing for selective filtering of the list based on the markup.

Note 1: The Subject of the Markup must match the Item’s Subject exactly for it to appear as a selection in the markup’s Responsibility dropdown choices (i.e. it is case sensitive). If you do not include a Subject for an Item, it will be available to use on all markups regardless of the subject.
Note 2: If you want to also have the option to enter a name not listed in the dropdown choices, click on Format while in the Add Column or Modify Column dialogue box and check the box for “Allow Custom Text”.
Note 3: Many Bluebeamers have custom profiles for each project as the Responsibility list may be job specific. A responsibility column is also handy for Design and Constructability Reviews.
Note 4: If you want certain custom columns, custom tool sets and toolbars available in Studio Sessions, they are stored in the document (or **Saved in a Profile). Make your changes to your worklist columns, etc with the document opened that you plan to upload to Studio. Save the document after you have made your customizations, then upload it to Studio.
Note 5: If you have 10+ Subjects or Responsibility Items (names) to add, it may be quicker to create a file and use the Import Option in the Modify Columns dialogue box.
Creating a Responsibility List to Import
This begins with a CSV file. You can create a CSV file even without Excel by just using NotePad using these steps:
1. Access Notepad click on Start | All Programs | Accessories | NotePad or if using Windows 8+ use the Charms feature and search for “NotePad”
2. Using the format “Item”,”Subject” type in one choice per line with each component in “quotes” and separated by a comma as shown here:

3. Once you’ve added all your entries, Click File | Save as and name it ResponsibilityList.TXT (save it as a .TXT file on your desktop).
4. Use Steps 1 and 2 from the “How to add a Responsibility code to your Markups List” above and select Import.
Note: The Import option will replace an already existing list of Items in your custom column for the document you have open.
If you **save it to a profile it is changing the list for all documents using this profile moving forward.
**Check with your network administrator before saving to a profile as your company’s profiles may be on a shared drive and impact all other Bluebeam Revu users.
If you’d like to hire me to create Custom Profiles, Toolbars and Tool Sets for your firm, please Email Me Your Contact Info.
Bluebeam Revu Quick Tip: Spaces Snapshots November 19, 2014
Posted by carolhagen in Bluebeam Revu, Construction Industry - Software.Tags: Bluebeam, Bluebeam Revu Tips, Construction Plans, snapshot tool, Spaces
add a comment
Before marking up your plans, particularly for the punch process many clients use the Spaces Tool to designate areas. Today’s tip is a bonus of taking the time to create spaces. You can grab a snapshot of a space quickly. Just open the spaces tab and right click!

There are a few Settings | Preferences (CTL+K) for the Snapshot Tool that you can tweak including the resolution, whether you want vector graphics when pasting to another program and including markups in your snapshots. Obviously for the punch process you’d want to include the markups but there are applications for not including the markups as well.
If you have questions you need answered about Bluebeam, reach out to me on LinkedIn, email me or add your question in the comments. Perhaps your question will appear in a future Bluebeam Revu Tip on this blog.
Bluebeam Trick: Handwriting to Text Comment on Tablet September 2, 2014
Posted by carolhagen in Bluebeam Revu.Tags: Bluebeam, Bluebeam Revu Tricks, Bluebeam Tips, Handwriting to Text, Pen tool
1 comment so far
 The Pen tool is often used on tablets to make notations as it is much easier than keyboard input when walking a jobsite. Handwritten notes are common markups on field documents, but did you know you can turn handwriting to text automatically?
When using the Pen tool you can have Bluebeam automatically recognize your handwriting before placing the markup. It places the associated text in the comments column of the Markups list for you. To turn this on, adjust your Revu preferences for your tablet.
Go to Preferences (Ctrl-K)| Select Tablet | Check the Auto Recognize Text box

This option only appears if you have a tablet PC, touch screen or tablet device attached to your computer and is unchecked as the default in Bluebeam Revu. If you use a Surface Pro or other tablet PC you’ll want to change this today.
It works best with hand printed text.
The sensitivity is for pressure sensitivity when using the pen or highlight tool. Pressing down firm produces a thicker line. Note that not all tablet devices support pressure sensitivity.
This comes in handy when you don’t have a custom punch symbol with the specific description you need. You can then lasso multiple markups together like a punch symbol and the pen markup and group them together, or in my case above, the arrow and the pen markup.
If you liked this tip you might also like:
Bluebeam Revu iPad tips: Adding audio, video and perform field measurements
Bluebeam Revu Tip: Email or Script to Send to Box.com File Folder May 29, 2014
Posted by carolhagen in Bluebeam Revu, Construction Industry - Software.Tags: Bluebeam, Bluebeam Revu Tips, Box.com, Revu iPad, script
5 comments
For those Bluebeamers using an iPad Revu and Box.com to sync files, here’s the perfect way to get your files from Bluebeam Revu shared to Box quickly using a script (or email).
Update 5/30/14: You can also email documents to Dropbox https://sendtodropbox.com/
First, you’ll need to decide what folder in Box you want your Revu Files sent to. Login to your Box account, navigate or create the folder you want your Bluebeam files to go to then click on More and mouse over the Upload Options | Email Files to this Folder
 Then it will bring up the Folder Properties. Make sure you check the “Allow uploads to this folder via email” option.

This makes an email address for uploading directly to your specified Box folder. Now copy the email address it generates and use it to email documents directly to Box from inside Bluebeam Revu Standard. To make this automatic and not have to type the email address each time you can create a script.
To create a script to Flatten and email to that folder you’ll need a Bluebeam Extreme license. Then follow these steps:
To open the Bluebeam Script Editor, navigate to the Documents Tab and click on Script
Enter the Description “Flatten and Upload to my Box Folder”
Grab the Box logo or an appropriate icon you have as a JPEG file on your computer. To grab the box logo off the internet, you can search for Box in Google then right click on the Box logo and choose “Save Image As” and name the file Box in the .jpg format. Screenshot for those who need the help:

Now for the actual Bluebeam Script. Enter in the script dialogue box type “Flatten()” Hit Enter for the next line and type “Email(yourboxfolderemailaddress)”.

If you want your documents to load faster on the iPad, you may want to reduce the file size before uploading to Box. Just add the line
ReduceFileSize(High,150,true,false,true) [where High reduces the image level, 150 is the DPI, then True to Drop Fonts, False to not drop thumbnails, metadata and other Miscellaneous items, and True to Compress] before the Flatten in the script editor. Keeping the thumbnails can be helpful on the iPad.
You may want to automatically add Headers and Footers to this script as well, especially if you’re in business development and are creating customer facing documents, brochures, etc.
The simplist form of the HeaderFooter script is designating the header contents (left, center right) and footer content (left center right). An Example would be HeaderAndFooter(“”,”<>”,””,”Carol Hagen”,www.hagenbusiness.com,602-570-7289) which centers the date in the header and my name in the footer left, website in the footer center and phone number in the footer right on all pages of the document.
Please share this with your construction contacts as they are using Bluebeam too. If you need help with scripts or need some Bluebeam training, feel free to reach out.
Bluebeam Trick: OCR Kills Two Birds with One Click April 15, 2014
Posted by carolhagen in Bluebeam Revu, Construction Industry - Software.Tags: Bluebeam, Bluebeam Revu Tips, Extreme, OCR
add a comment
Many Bluebeamers only have the CAD or Standard versions and these Revu clients don’t know what they’re missing. The Extreme version offers some real time-saving functions and can perform multiple processes in one step. The OCR (Optical Character Recognition) function can deskew and detect the orientation of your document while it converts image content to text.

Extreme has more great features including:
Scripts – process multiple functions in one click like “Flatten and email”, set security, add header/footer, stamp, reduce file size, etc
Forms Creation – Create fillable forms, stamps and templates
Redaction – Hide sensitive content permanently from prying eyes
Batch Link – Hyperlink all your plan set pages to the sheet index automatically.
Structures – Make multilevel bookmarks for your plans grouped by specialty: architectural, civil, electrical, etc
Watch for upcoming Bluebeam tips on all these features. To save time and improve team productivity with Bluebeam Extreme.
request a quote today to upgrade multiple licenses from CAD or Standard to Extreme.
Bluebeam Keyboard Shortcuts March 11, 2014
Posted by carolhagen in Bluebeam Revu, Construction Industry - Software.Tags: Bluebeam, Bluebeam Revu, Bluebeam Revu Tips, Keyboard Shortcuts, Shortcuts
5 comments

Bluebeam keyboard shortcuts can save you an enormous amount of time and many are worth the effort of memorization. Bluebeam has a Keyboard shortcuts document hidden inside Revu. This PDF document contains all the shortcuts for Markup and Editing, Viewing, Navigation, Page Manipulation, Show Tabs, Advanced Text, File Operations and miscellaneous items. All the function key shortcuts, and keystroke combinations of Alt, Ctrl and Shift are packed into this fabulous resource that most Bluebeamers have overlooked.
The Bluebeam Revu Keyboard Shortcuts is accessed by navigating to the Help Tab and clicking on the down arrow (inverted triangle) next to the Help icon. I find most people who find this document open it and only look at the first few pages. In essence, they only see the mouse navigation buttons. Continue on to the fourth thru sixth pages and you’ve hit the mother lode!
Now go get ’em Bluebeamers!
How to Combine Photos into One PDF using Bluebeam January 9, 2014
Posted by carolhagen in Bluebeam Revu, Construction Industry - Software.Tags: Bluebeam, Bluebeam Revu, Bluebeam Revu Tips, PDFs and Photos
add a comment
Ever had a bunch of images that you wanted to combine into a single PDF? It’s easy with Bluebeam Revu!
Step 1: Just drag all your photos or images into Revu that you need
Step 2: Select the File | Combine and check add all open files.
Better at learning while watching a video? Here you go:
If you’re looking for more great tips you can subscribe to this blog (in the panel to the right) or if you prefer, follow my Bluebeam Revu Tips page on LinkedIn.
If your construction team needs training or more Bluebeam licenses, we’re here to help offering volume discounts on new license purchases, enrollment for automatic updates and both on-line and on-site Bluebeam Revu Training at your facilities. Just Email Me what you’re interested in.
Bluebeam Revu Idea: The Ultimate HomeBuilder As-Built December 3, 2013
Posted by carolhagen in Bluebeam Revu, Construction Industry, Construction Industry - Software.Tags: as-built, Bluebeam, Building, construction, Homebuilder
add a comment
Once you’ve completed building your customers dream home you hand over the keys and all the documentation. Warranties, specifications, owner’s manuals, etc – it’s a stack of paper that may need it’s own filing cabinet. What if you delighted your home owner with an interactive As-built with the appliances, fixtures and all their documentation embedded on the plans? The ultimate as-built would deliver a remarkable experience.
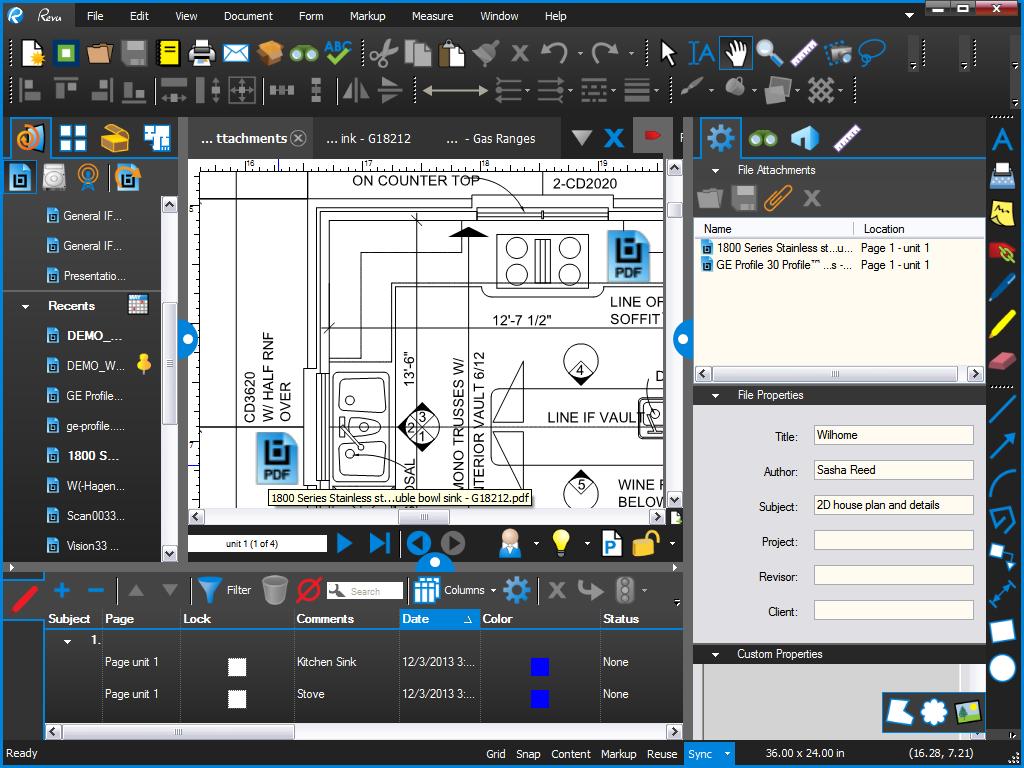
PDF icons open up underlying documentation for each appliance or fixture
In the above example the PDF icon is shown with the attachment markup function.
This is easy to create using the Attachment option on the Markups Tab
Once you select the file and click to where you want it embedded on your plan set, you can open the Properties Tab on the Markup and change the ICON to PDF, Show File Name, paperclip, Tag, Graph, Attachment “push pin”, etc. You could also include a Legend to explain what each symbol/icon represents (warranty, spec, photo, energy efficiency, etc).
Interactive As-Builts make the documentation make sense to everyone. his is also great in the commercial space where a facilities manager might need to review maintenance instructions, etc.
To share these embedded PDFs on the planset with your homeowner, remember to flatten the document markups before sharing so the hyperlinks work using other PDF programs. Remember it is likely that your homeowner will use a PDF reader that isn’t Bluebeam.
Tip: You can add other Icons to the Icon choices like a camera to symbolize embedded photos.
What do you do to make your as-builts pop? Please share your ideas in the comments with our readers.
Bluebeam Tip: Translate Your Markups November 13, 2013
Posted by carolhagen in Bluebeam Revu, Construction Industry - Software.Tags: Bluebeam, Bluebeam Revu, collaboration, construction, Translate
add a comment

An often unnoticed function in Bluebeam Revu is the ability to translate all your markup annotations. Have a Spanish speaking subcontractor, no problemo, the punch process and design reviews will be a snap!
It’s quite easy to use, just navigate to the Document tab, select Process and choose the Translate Markups.
This dialogue box will appear for you to select the to/from language:

With over 50 languages to choose from, you’ll be able collaborate with construction professionals worldwide.
Once your comments are translated, Flatten and Email to get your message across. With the hyperlinks, there’ll be no confusion!
Note: Bluebeam leverages Google Translate to perform the translation so an internet connection is required. This was added to Bluebeam Revu in the version 9 release.
Bluebeam Tip: Make Your Construction Punch Process Faster with Spaces October 30, 2013
Posted by carolhagen in Bluebeam Revu, Construction Industry - Software.Tags: Bluebeam, Bluebeam Revu Tips, punchlist, Spaces, tips
add a comment
The Construction Punch Process has been a time-consuming process for most general contractors until Bluebeam Revu and a few other software solutions added iPad apps. The problem with most applications is that you have to manually add the building number, floor number and room number to each punch item. Another issue is that your punch item reports aren’t hyperlinked to each punch markups on the drawing, often causing confusion for the specialty trades.
With Bluebeam Revu’s Spaces feature you can have the location automatically logged with each punch item or mark-up and use it to sort and report your punch by floor, room or building. It’s easy and just takes a few minutes of prep work.
Create Spaces
On multi-story buildings you’ll begin by creating Nested Spaces. Nested Spaces let you create spaces inside spaces e.g. Rooms 100 – 120 inside Floor 1
Open up the spaces tab or use the shortcut Alt+S.
On the Space tab button bar, click Add Space.

Bluebeam Spaces Tab
Click and drag a rectangle or multi-click a polygon to define the floor or area.
In the Add Space dialog, enter a name such as “Floor 1,” then click OK.
Click inside the floor or area to begin defining a space on that floor.
In the Add Space dialog, enter a name such as “100” for room 100, then click OK.
Spaces Tip: By referencing just a number, you can create spaces in room number order and Bluebeam will automatically increment the number by one for you.
NOTE: Spaces can be nested but cannot partially overlap; spaces must be separate from or entirely contained within one another.
Once your spaces are defined, they’ll automatically be added to the markups list whenever you add a markup or punch item to the drawing. If you don’t see the Spaces column in your markups list, you may need to scroll to the right or click the columns button in the markups list and select spaces to add it to the markups grid.
You’ll need Bluebeam Revu version 10 or higher for access to the Spaces feature so if you’re still on Bluebeam Revu 9.5, let me know via Email and I’ll expedite your upgrade to Revu 11.
Reminder: To ensure every punch item on your report is hyperlinked to the corresponding punch symbol on your drawing don’t forget to Flatten before emailing your Punch Report. Plattening ensures the links won’t be broken if your email recipients open the PDF with a PDF viewer other than Bluebeam.
BONUS: The larger the project, the more mission critical the punch process is. When you need to be punching one floor, having the trades correcting the punch on another floor and your inspector performing a back check on another floor all at the same time, you’ll want to use “Real-Time” Punch using Bluebeam Studio. It expedites the process and your subs, architects and inspectors can update their status live (note this video is 30+ minutes in length)
All this is included in Bluebeam Revu. That’s why over 500,000 people are licensed to use Bluebeam around the world. Please share this with your construction business associates – you’ll make friends for life. After all doesn’t everyone want to work smarter not harder?
Winning Projects with Interactive Construction Presentations October 17, 2013
Posted by carolhagen in Bluebeam Revu, Construction Industry - Software, Construction Industry Hardware.Tags: Bluebeam, business development, construction, presentations, U-Pointer
1 comment so far

Turn Your Whiteboard into a Touch Pen Display
Construction presentation effectiveness is the difference between winning and losing a project. Since Powerpoint came on the scene, the innovative contracting firm has mastered storytelling and realizes than communication is a two way street. Proving your understanding of the project scope, site challenges and constructability is paramount to success. The static slide is being usurped by interactive presentations. Here are a few ideas to convert your next presentation from drab to interactive:
Make Your Information Visually Appealing
One of the most common presentation mistakes is made when displaying numbers in a row and column format. Most people think, I’ll make a chart or graph which is old school. Instead, create a Heat Map using Excel. This is especially effective when presenting energy data on a LEED construction project to an owner. This video from Annielytics is an excellent tutorial of how to create a heat map:
Add Interactive Elements
Links to supporting project data, photos, videos etc are the basics. Hyperlinking Slide content to construction documents or real-time data collection that translates these field updates into easily understood moving visuals are recommended. How you render project progress completion by building, floor or room can transport an owner inside his own building. Here’s an example of a design coordination meeting recently shared by Ryan Companies using Bluebeam Revu in a Studio Session:

All annotations and task statuses are captured in the Markups list of Bluebeam
Update Your Construction Visual Aides
 Using whiteboards, projectors and flat screen monitors is so 2008. Convert your Whiteboard or wall-mounted flat screen monitor into a touch pen screen with the U-Pointer. It’s small and portable to take with you to a client’s office. Wherever your need to present, you can make a lasting impression, even at the jobsite:

Interactive Display at Jobsite with U-Pointer
Add a Liquid Multi-Touch Display and immerse your audience with an iPad-like project kiosk experience. Show your construction team link portal, interactive

32″ Liquid Display with Stand
plan sets, your visual punch process, the job site check-in process for your workforce and how you communicate when resolving time-sensitive issues. The electronic documents of today necessitate mark-up and annotation capabilities. Your client is expecting a mobile, connected and collaborative team that communicates efficiently.
Whatever cost effective technology you use on your construction site that adds value, improves communication and streamlines processes is a winning proposition to the construction team and the project owner.
For additional information on any of these technologies, please contact me directly via Email and please specify what product you are interested in.
Bluebeam Tip: How to Create Your Own Punch Symbols Quickly October 15, 2013
Posted by carolhagen in Bluebeam Revu, Construction Industry - Software.Tags: Bluebeam, Bluebeam Revu Tips, construction, Punch Symbols, tips
8 comments
Until the Bluebeam Revu 11 release, creating punch symbols was a laborious task requiring coping and editing each symbol in the tool chest. Bluebeam has punch symbol tool sets available to download and import (http://www.bluebeam.com/us/support/extensions-tool-sets.asp ) however, if you want to create your own groups of symbols there’s now a much quicker and easier way.
Creating Your Own Punch Symbol set in Bluebeam begins with a CSV file. You can create a CSV file even without Excel by just using NotePad. To access Notepad click on Start | All Programs | Accessories | NotePad.
Using the format “Subject”,”Code”,”Comment” (the comment is the detail description) type in one code per line with each component in “quotes” and separated by a comma as shown here:
 Once you added all your entries, save the it as .TXT file.
Next, Navigate to the Tool Chest and click on the gear [1] just below the tool chest to open Manage Tool Sets,
In the Manage Tool Sets click on Add [2], Name the Punch group PunchKeytrade(where trade is a specific specialty ie. Electrical, Mechanical, Carpentry, etc).
 This will appear as the header for a group of punch symbols and will appear in alphabetical order in your Tool Chest. If you are a general contractor you’ll want to create separate symbol groups for each trade to make it easy for the subcontractors to update the punch status during the back check process. This is particularly useful if you are also using Bluebeam Studio to perform a real-time punch and back check.
Once the Punch Group is created, click Modify [3] and click on the Punch Key Import [4] button (only in Revu 11+), then navigate to the .TXT file you created, select it and click OK. This will import each line of the .TXT file into the Tools window on the Modify Tool Set pane as shown below:

To finish, Make sure the relative path box is checked and optionally the show in all Profiles (if you desire), then Click OK to complete the Modify Tool Set.
Bluebeam Tip: How to Only Print, Email or Export Pages with Markups October 7, 2013
Posted by carolhagen in Bluebeam Revu, Construction Industry - Software.Tags: Bluebeam, Bluebeam Revu Tips, construction, email, tips
9 comments

After taking the time to markup documents in Bluebeam Revu, why send 100 pages when there are only a few pages with markups or notes on them? Instead of sending the full set of plans or a lengthy multi-page PDF, it is faster and sometimes more effective to only email the document pages that have markups. This is especially true when not everyone uses Bluebeam Revu. Here’s the quick 3 step process to just send pages with markups to the Print, Email or Export Pages option of Bluebeam:
1. Navigate to the Markups List
2. Press CTL-A to select all markups
3. Choose the desired function: Email, Print or Export Pages
The Page selection will prefill with the highlighted pages only. This is also true with the search function in Bluebeam.
Bluebeam Revu Tips for iPad: Add Audio, Video and Perform Field Measurements September 18, 2013
Posted by carolhagen in Bluebeam Revu, Construction Industry - Software.Tags: Bluebeam, Bluebeam Revu Tips, construction, mobile, project management
add a comment
Bluebeam Revu iPad is available on iTunes and can help field workers access plans and perform the punch process visually. The audio and video markups were added in Revu iPad version 1.4 and field measurements in 2.1
Typing on an iPad is rather awkward when holding the iPad in your hand. So why not annotate with an audio recording, video clip or photo. Here’s how to insert them all onto your PDF:
Field Measurements are not as accurate as using the desktop version of Bluebeam Revu (which has a snap to content option), but having the ability to do quick spot checks on the project site is a timesaver.
Watch this video to see Field Measurements in action:
If you don’t own an iPad, that’s ok as Bluebeam Revu desktop also works well on tablet PCs like the Surface Pro, Lenovo Yoga and other convertible laptops. Need to learn more about Bluebeam Revu or want a 30 day free trial of Bluebeam Revu for your laptop? Just visit our website, www.hagenbusiness.com
Subscribe to this blog for weekly Bluebeam Tips and please share this with your fellow team members.
Bluebeam Tip of the Week: Quick Security Sessions August 23, 2013
Posted by carolhagen in Bluebeam Revu, Construction Industry - Software.Tags: Bluebeam, Bluebeam Revu Tips, PDF security, security
1 comment so far
Quick security settings allow you to create permissions and passwords that you can apply to documents repeatedly without having to recreate or define them each time. You can control much more than the password including the ability to print, edit, allow copying text/graphics or extract content. Some contractors define these settings by project or by client. Here’s how you can create a new security set:
You can see how much time you’ll save when sharing your content sensitive information with others and with a simple click of the lock button you can reuse your settings in an instant. It’s great for applying security to multiple documents all at once too.
If you liked this post, You may also like these Bluebeam Tips:
Bluebeam Revu Tip: Working with More Screen Real Estate July 31, 2013
Posted by carolhagen in Bluebeam Revu, Construction Industry - Software.Tags: Bluebeam, construction, PDF, tips
3 comments
Update: New in Revu 11, hold the Shift + F4 and it will close/open (toggle) all the panels.
Bluebeam has many options toolbars and tabs that take up valuable real estate on your screen. When working on detailed drawing every inch counts so today it’s time you looked at the Interface button, located on the far right of the View Tab. It looks like this:

Toggling on/off the panels, command bar, status bar and navigation bar frees up real estate on your screen. You can even hide the tabs showing your open documents. You can go from a Fit Width setting File | View | Fit Width (CTL+0) like this:
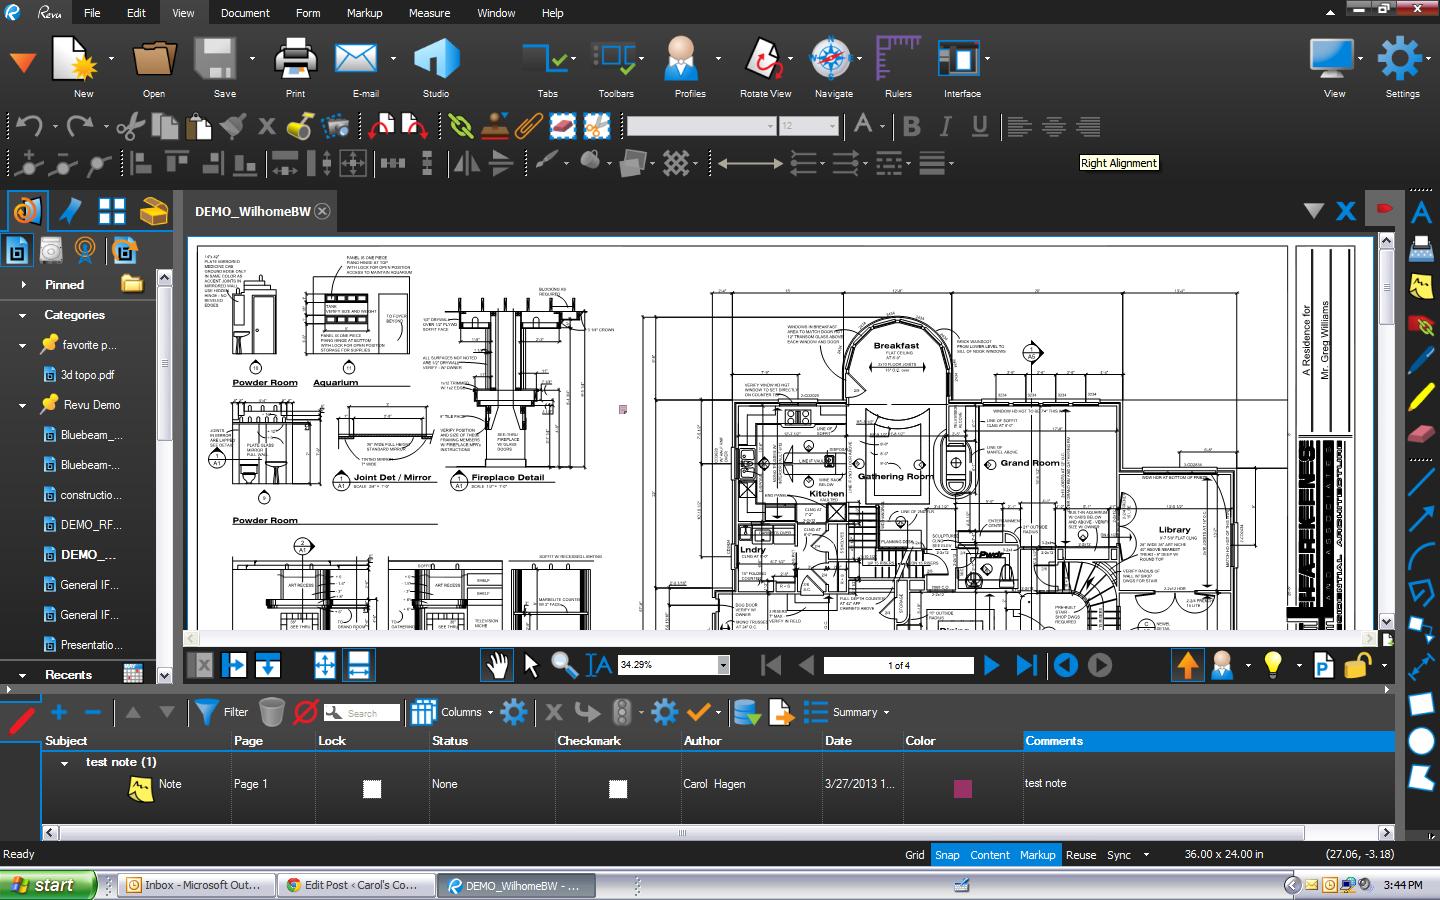
To this to see more of your documents at once.

You can of course also use the F11 key (the long cut to this is File | View| Full Screen, but you’ll want to toggle off the panels first or you’ll still have the left panel showing

Be careful to turn these back on or you may find yourself going crazy trying to remember commands. I’ve also seen people turn the status bar off (at the very bottom) and wonder why they can’t start a markup in the spot they click on. Snap to grid, Markup or content are great when you want them on but can drive you crazy if you don’t realize they are on.
Please share this with your other Bluebeam co-workers and reach out to me with any Bluebeam questions.
You may find these other Bluebeam Tips helpful too:
Bluebeam Tip: Callouts and Leader Lines
How to Deskew a Bluebeam PDF
Bluebeam Tip: Floating Toolbar Customization June 18, 2013
Posted by carolhagen in Bluebeam Revu, Construction Industry - Software.Tags: Bluebeam, tips, Toolbar, Tricks
add a comment
 Bluebeam’s floating toolbar is especially useful when working on small screens in tablet mode. Often I find myself in Full Screen Mode (F11) to maximize my viewing area. Having access to the functions I do most is a real time saver which is why you should customize your floating toolbar.
To Customize your floating toolbar and add the mark-up tools you use most, right-click on the floating toolbar and selecting Customize. You’ll need to do this before entering tablet mode as there is no “right-click” option with a pen stylus.
Some of my favorite items to add are email template, deskew, callout and previous view. What will you be adding to your floating toolbar?
My next tip will discuss email templates.
If you liked this post you may also be interested in:
Bluebeam Tip: Fastest Way to DeSkew (Straighten) a Scanned Document June 10, 2013
Posted by carolhagen in Bluebeam Revu, Construction Industry - Software.Tags: Bluebeam, Deskew, PDF, Tip, tips
3 comments
 Scanned documents are commonly found as email attachments and unfortunately often get pulled through a scanner at an angle. This occurs when a stack of documents or plan sets are fed through a desktop scanner. Here’s how to correct the skew in Bluebeam Revu.
Using your keyboard, Press Ctrl+Alt+D.
Your cursor will change to crossbars.
Click and drag a line that should be horizontal in the PDF. (Alternatively, you can also click two points.)
The Page Setup dialog will appear, 
showing a preview of the adjusted PDF. Click OK to complete the align/de-skew operation.
Another fast way to deskew is to add the Deskew button to one of your tool bars.

If you don’t own Bluebeam Revu, download a 30 day free trial today.
Bluebeam Tip: Add Dynamic Text to Your Tool Chest Symbol May 31, 2013
Posted by carolhagen in Bluebeam Revu, Construction Industry - Software.Tags: Bluebeam, Dynamic, Symbols, tips, Tool Chest
5 comments
 Sometimes you need a reference right on your planset for when a change was made. When it comes to markups, you can use stamps but did you know you can also add a Tool Chest Symbol?
Here’s how to create a simple symbol with dynamic text:
In Bluebeam Revu, Dynamic Text is not directly supported in symbols, however you can include a stamp that contains dynamic text. The dynamic text is updated when the symbol is added to the PDF.
Here is a quick example of creating a symbol that includes dynamic text:
1. Add the DateTime stamp to the PDF.
2. Create a Rectangle around the stamp. (You can use other markups like cloud, etc)
3. Select and then Group them. (Lasso them together and then press Ctrl-G).
4. Right-click and then click Add to Tool Chest. (or drag the grouped item into your tool chest of choice)
5. Add the symbol to the PDF.
The dynamic text for the date and time are updated when the symbol is added to the PDF. Now go get ’em Bluebeamers!


